Spot Welding Machine Control Panel Double Pulse Convenient Easy Installation Stable With Motherboard Plastics Base
Product Description
One set of spot welding machine control panel is powerful to use which can meet your accuracy needs.
Features:
The new motherboard adds a plastics base, which makes it easier to install. The panel is made of a snap-on plastics surface. No screw tip is left after installation.
Fine quality needle type glue filling transformer is used for motherboard power supply, which can protect collision damage during transportation, and has fine moisture resistance. Direct welding on motherboard also makes installation easier.
Supporting the production of a mask, so that you can also make the factory machine in the amateur conditions.
The parameters of the power down parameter are stored, and the parameters used during the last shutdown of the machine are read.
The output power regulation is linearized. The new version divides the output power by 100 equal parts.
The output of spot welding signal is increased. When the spot welding switch is pressed, the optocoupler is turned on. When the welding is finished, the optocoupler is closed after a certain delay (settable). The optocoupler can be used as feedback signal of automatic spot welding machine.
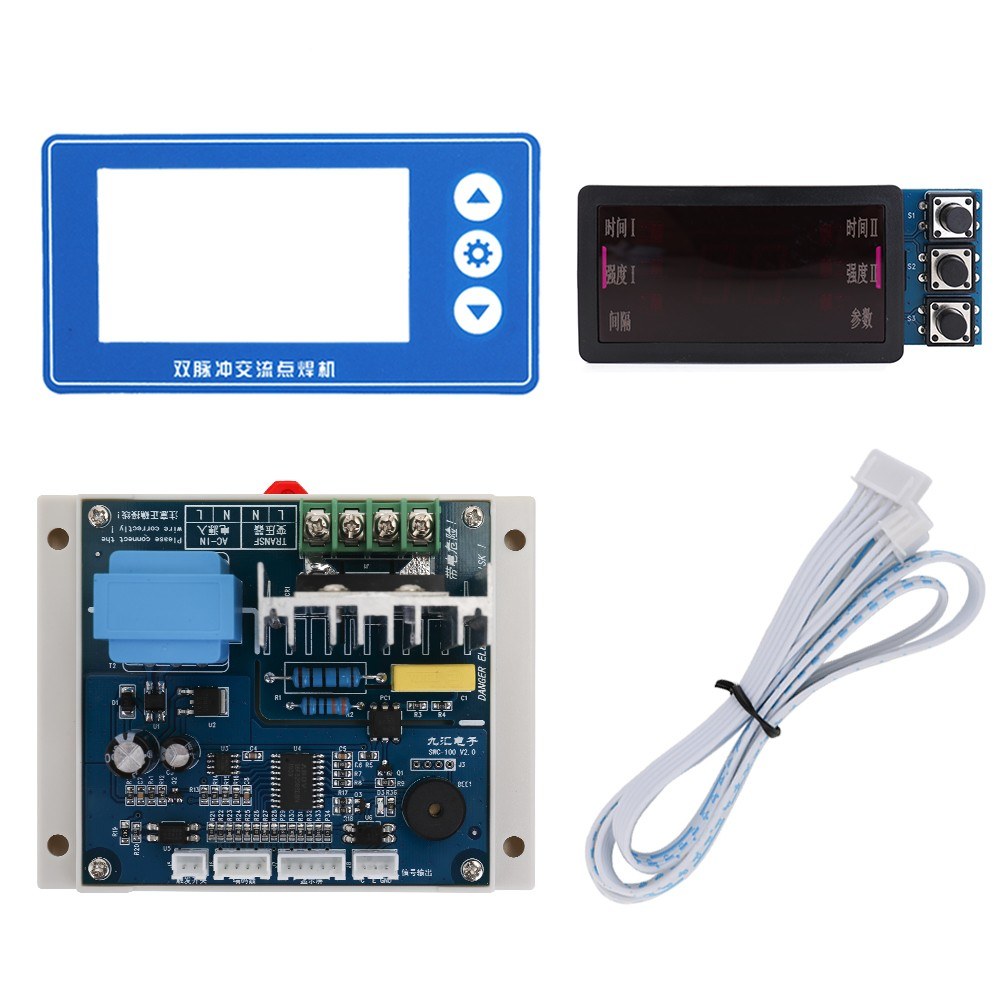
One Set include a motherboard, one display panel, a patch and one 400mm long 5P and one 2P lines.
Specifications:
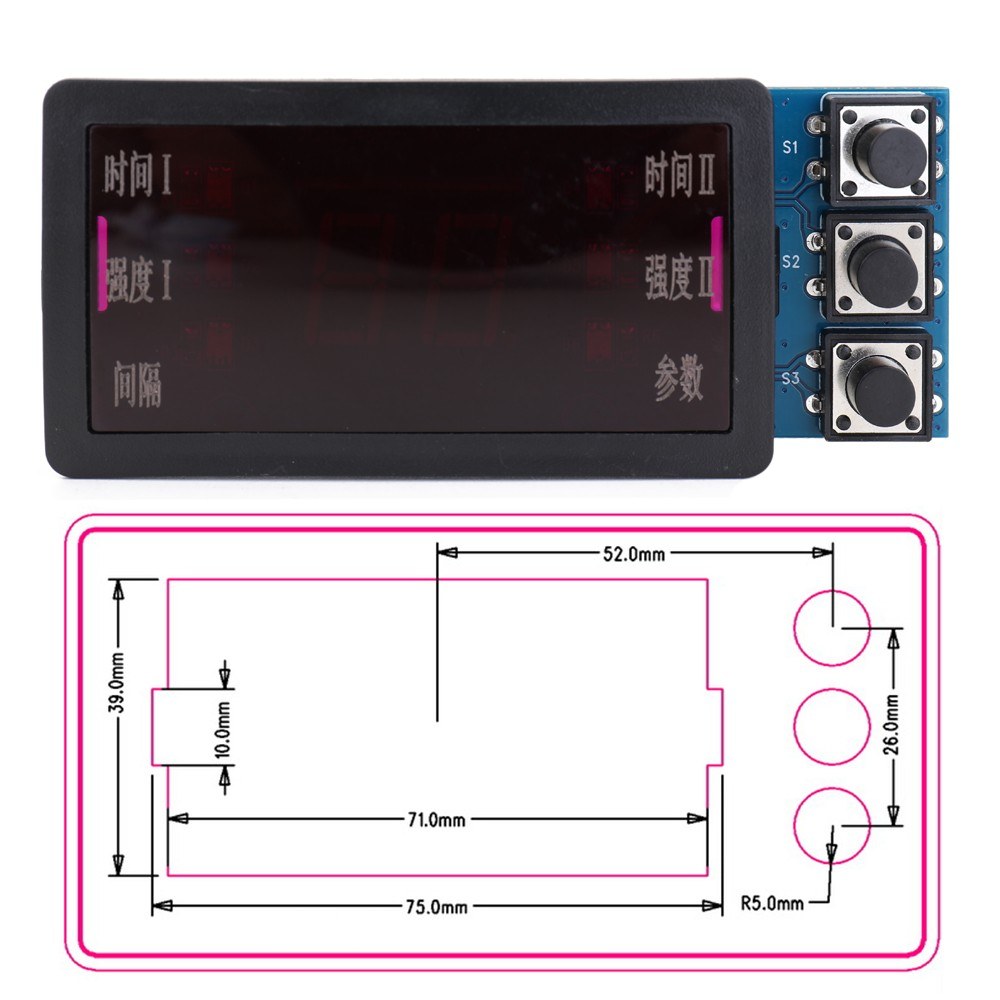
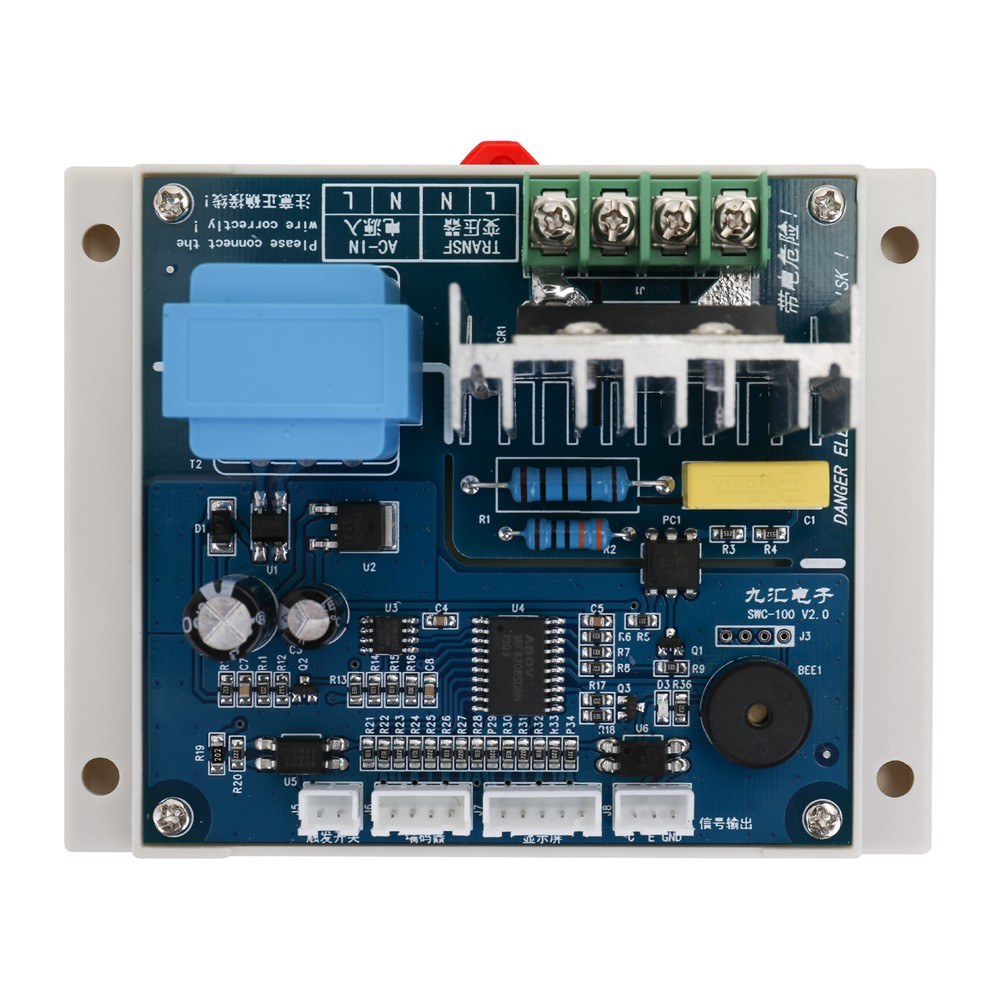
Motherboard Size: 115 * 90 * 55mm / 4.5 * 3.5 * 2.2in
Motherboard Weight: 184g / 6.5ounce
Display Panel Size: 100 * 45 * 20mm / 3.9 * 1.8 * 0.8in
Display Panel Weight: 32g / 1.1ounce
Patch Size: 115 * 60mm / 4.5 * 2.4in
Patch Weight: 2g / 0.1ounce
5P Lines Length: 400mm / 15.7in
5P Lines Weight: 8g / 0.3ounce
2P Lines Length: 400mm / 15.7in
2P Lines Weight: 4g / 0.1ounce
Package size: 145 * 110 * 85mm / 5.7 * 4.3 * 3.3in
Package Weight: 295g / 10.4ounce
Parameter Tuning:
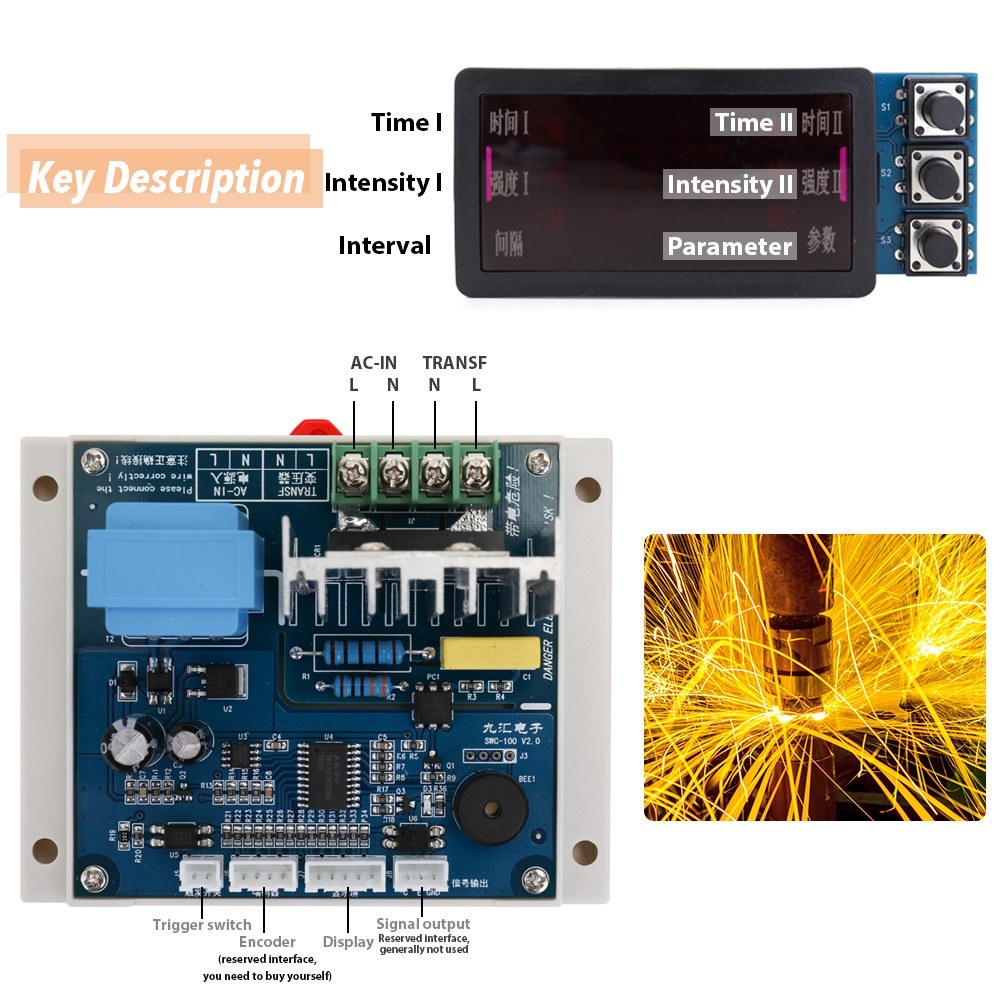
The first spot welding time:
Adjustable range 1-99 AC cycle (for safety, the board default maximum is 20, if more than 20, see the maximum limit section later, self-change).
Press the "Settings" button when the "Time 1" indicator light is on, the digital tube begins to flicker, press the "Add" or "Reduce" button to the desired value, and press the "Settings" button again to save and exit.
The first spot welding current:
Adjustable range 25%-99%, adjust the percentage of output power relative to full power (default maximum value is 99, if you need other values, see the Maximum Limit section later, change by yourself).
Press the "Settings" button when the "Current 1" indicator light is on, the digital tube begins to flicker, press the "Add" or "Reduce" button to the desired value, and then press the "Settings" button to save and exit.
The first and second spot welding intervals:
Adjustable range 1-99 AC half cycle, that is, the value multiplied by 10 milliseconds (board default maximum value is 25, if more than 25, see the maximum limit section later, self-change).
Press the "Settings" button when the "Interval" indicator lights up, the digital tube begins to flicker, press the "Add" or "Reduce" button to the desired value, and then press the "Settings" button to save and exit.
Second spot welding time:
Adjustable range of 0-99 AC cycle (for safety, the board default maximum value is 20, if more than 20, see the maximum limit section later, self-change)
When this time is set to 0, it operates in the state of monopulse.
Press the "Settings" button when the "Time 2" indicator lights up, the digital tube begins to flicker, press the "Add" or "Reduce" button to the desired value, and then press the "Settings" button to save and exit.
Second spot welding current:
Adjustable range 25%-99%, adjust the percentage of output power relative to full power (default maximum value is 99, if you need other values, see the Maximum Limit section later, change by yourself).
Press the "Settings" button when the "Current 2" indicator light is on, the digital tube begins to flicker, press the "Add" or "Reduce" button to the desired value, and then press the "Settings" button to save and exit.
Parameter storage and transfer
The machine automatically records the last parameters when it is turned off, and automatically loads it on the next boot.
At the same time, the machine can store 5 sets of common parameter settings.
A, The number of the current parameter is displayed when the "parameter" indicator is lit, and the number is 0 if the current parameter is boot load parameter or if the parameter has been modified.
B, Press the "Settings" key, enter the selection of loading and storage parameters, press the "Increase" or "Decrease" button to display the "Ld" and "SA" respectively, indicating that the subsequent operations are loaded or stored, and press the "Settings" button when the "Ld" is displayed, and if the storage parameters are needed, when the "SA" is displayed. Press the settings button.
C, Connect the item, then display the number of parameters, press the "add" or "subtract" button, the display screen changes from 1 to 5, respectively, representing the parameters of five items, select the entry number needed to be stored or transferred, press the "set" key to achieve loading or storage.
Maximum limit:
Because spot welding transformer is usually made by hand, power, wire diameter, turns are not the same, resulting in large parameter dispersion, controller to adapt to a variety of transformers, the adjustable range of parameters is very large, very likely due to improper settings lead to cell damage (I have due to spot welding time adjustment for too long, so that the cell surface was burned through. So it is necessary to limit the maximum value of each parameter. This machine has the function of limiting the maximum value of parameters.
The setting method is as follows:
1. Press the "Add" or "Subtract" button to make the "Parameter" indicator light on, then press the "Settings" button not to let go, about 5 seconds into the upper limit setting function, when the "Time 1" indicator flashes, while the digital tube shows the current spot welding time 1 upper limit.
2. Press the "increase" or "decrease" keys "time 1", "current 1", "interval", "time 2", "current 2" indicator lights flicker in turn, and display their respective upper limits, select the parameters needed to set, press the "set" key, at this time the digital tube flickers, press the "increase" or "decrease" key to change the limit value, adjust to After pressing the "setting" button, the display will stop flashing, and the setting of the current parameter is completed.
3. After setting the limits, you need to save them to take effect. The method is to press the "subtraction" button to make the "parameters" indicator flashing, the digital tube shows "SA" and the "settings" button, which completes the saving. If you do not want to save, you can not operate the button for 5 seconds, the system will exit the settings function and discard the previously modified parameters. If it is not saved, all settings are invalid, and the control board is still running according to the original limit value.
The use of signal output:
The control board is equipped with the output of spot welding signal. When the spot welding switch is pressed, the optocoupler is turned on. When the welding is finished, the optocoupler is closed after a certain delay (which can be set). It can be used as the feedback signal of automatic spot welding machine. The signal is synchronized with the LED indicator on the board. The delay time is set as follows:
Press the "subtraction" button to make the "parameter" indicator light on. Pressing the "setting" button will go into the upper limit setting state, but do not let go until the digital tube shows the value and flicker. The value displayed at this time is the delay time of the signal output after spot welding. The half-cycle meter displays 10, which means the optical coupling. The 100MS will be closed after the spot welding is completed, with reference to the indicator on the board, both of which are synchronous.
Package List:
1 * Motherboard
1 * Display Panel
1 * Patch
1 * 400mm Long 5P lines
1 * 400mm Long 2P lines